Halloween Witch Hat Cookies
These Halloween Witch Hat Cookies are a whimsical treat that will enchant your Halloween gathering. Perfect for parties or family fun, they combine the joy of baking with the excitement of Halloween. Kids will love helping to create these chocolaty delights, which are as delightful to look at as they are to eat. Customize each hat and watch them disappear faster than you can say trick or treat!
Why You’ll Love This Recipe
- Fun Family Activity: Get the kids involved in creating their own spooky treats with this easy-to-follow recipe.
- Creative Customization: With various icing colors and decorations, you can personalize each cookie to match your Halloween theme.
- Perfect for Parties: These cookies are a showstopper at any Halloween event, making them a great addition to your dessert table.
- Deliciously Chocolaty: Enjoy the rich flavor of chocolate cookies paired with sweet icing that everyone will love.
- Quick Assembly: With simple steps and minimal prep time, you can whip up these witch hats in no time!
Tools and Preparation
To create these enchanting Halloween Witch Hat Cookies, you’ll need some essential tools. Having the right equipment makes the process smoother and more enjoyable.
Essential Tools and Equipment
- Cupcake Cones Baking Rack
- Baking Sheet
- Parchment Paper
- Decorating Bags
- Icing Tips (2B and 3)
- Knife
Importance of Each Tool
- Cupcake Cones Baking Rack: This tool ensures that your sugar cones bake evenly and hold their shape perfectly.
- Decorating Bags: Using these makes it easy to pipe your colored icing with precision, allowing for beautiful designs on each cookie.
- Icing Tips: The right tips help create different effects when decorating, making your cookies look professional.
Ingredients
These ingredients will come together to make delightful Halloween Witch Hat Cookies that everyone will enjoy.
Cake Mix
- Favorite Cake Mix or Try Wilton’s Chocolate Cake Recipe
Cookies
- Store Bought Chocolate Cookies or Try This Recipe from Wilton
Icing Colors
- Lemon Yellow Icing Color
- Black Color Mist Food Coloring Spray
- Rose Icing Colors Pink Food Coloring
- Violet Icing Color, Gel Food Coloring
- Golden Yellow Icing Color
- Orange Icing Color
Additional Ingredients
- Sugar Cones
- Creamy White Decorator Icing, 4 lb. Tub
How to Make Halloween Witch Hat Cookies
Step 1: Prepare & Bake the Cones
- Prepare the cake mix following the chosen recipe’s instructions.
- Place the Cupcake Cones Baking Rack on a baking sheet.
- Insert sugar cones into the rack and fill them with 2 tablespoons of cake batter.
- Bake and cool the cones as per your recipe’s timing instructions.
Step 2: Spray the Cones
- If needed, trim any excess risen cake from the top of the cone using a knife.
- Place cones wide side down on parchment paper.
- Using Black Color Mist, spray each cone black.
- Allow them to dry for about 10 to 15 minutes.
Step 3: Tint the Icing & Prepare the Bags
- Tint 1 cup of creamy white decorator icing orange.
- Combine violet and rose icing colors to tint another cup purple.
- Prepare two decorating bags with tip 2B and fill them separately with orange and purple icings.
- Tint ¼ cup of creamy white decorator icing yellow by mixing golden yellow and lemon yellow colors; place this in a decorator bag with tip 3 attached.
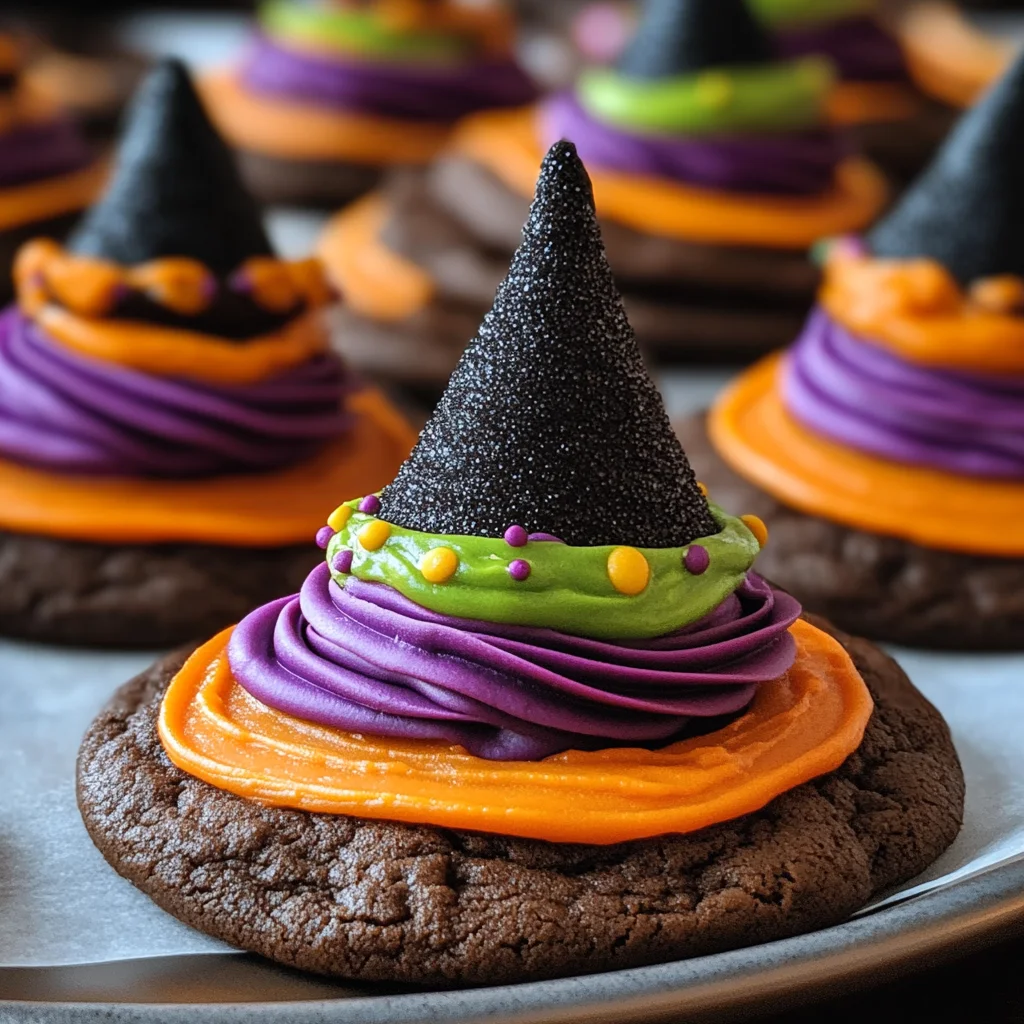
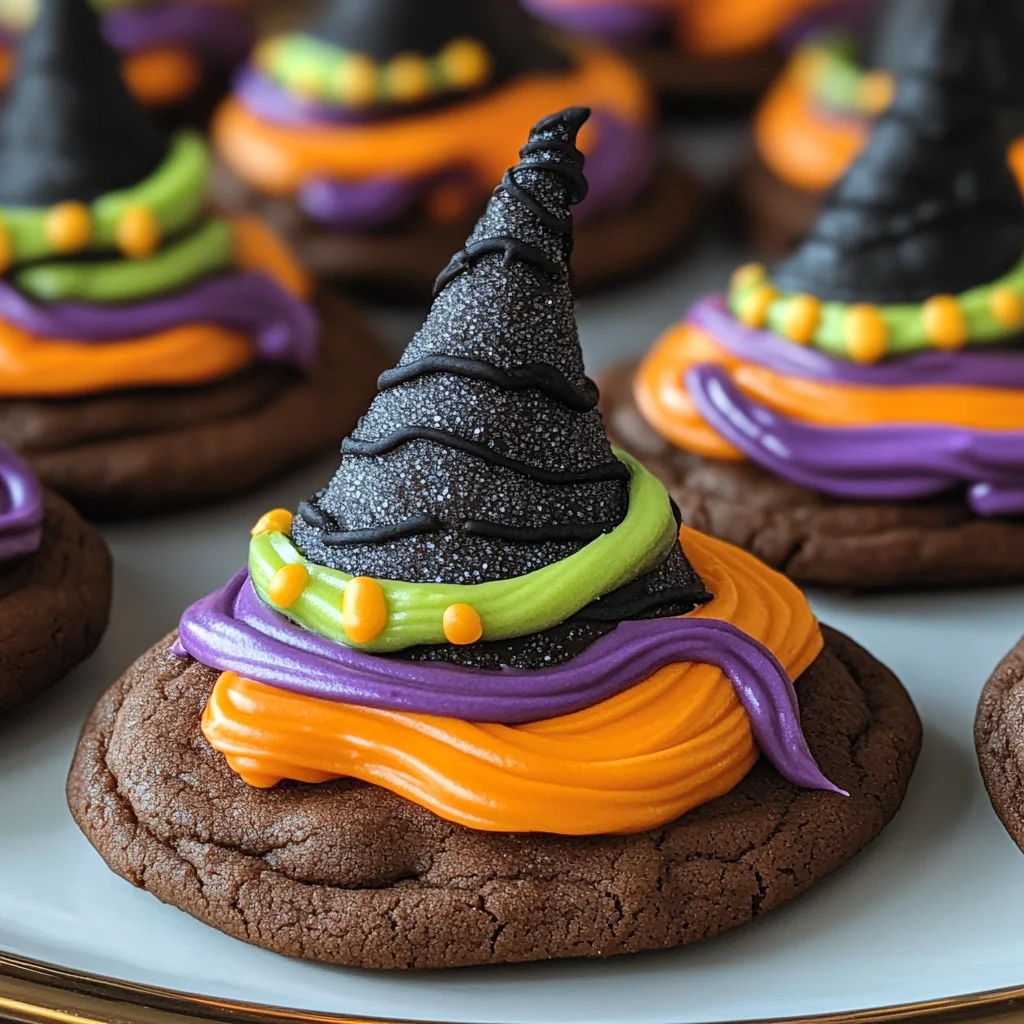
Step 4: Assemble the Witch Hats
- Pipe a small amount of orange icing onto a cookie’s center then place a cone on top.
- With tip facing outwards, pipe a band around half of the cones using orange icing; smooth it with a spatula.
- Repeat this process with purple icing on the other half of cookies/cones.
- Let them set for about 15 to 20 minutes.
- Finally, use yellow tinted icing with tip 3 attached to pipe a buckle around each hat’s band.
- Allow them to set for another 15 to 20 minutes before enjoying!
How to Serve Halloween Witch Hat Cookies
These Halloween Witch Hat Cookies are not only delightful treats but also a fun centerpiece for your Halloween gatherings. With their vibrant colors and whimsical shapes, they can be served in various creative ways.
Cookie Platter
- Arrange the cookies on a large platter for an eye-catching display. This makes it easy for guests to pick their favorites.
Gift Bags
- Place individual cookies in themed gift bags to hand out as party favors. This is a sweet way for guests to take home a piece of the celebration.
Dessert Table
- Set up a dedicated dessert table with Halloween decorations. Include your witch hat cookies alongside other spooky treats for an impressive spread.
Kids’ Party Treats
- Serve these cookies at children’s Halloween parties. The fun shape and bright colors will surely delight young trick-or-treaters.
Seasonal Drink Pairing
- Pair these cookies with festive drinks like pumpkin spice lattes or spooky punch. The flavors complement each other perfectly.
How to Perfect Halloween Witch Hat Cookies
To ensure your Halloween Witch Hat Cookies turn out perfectly, consider these helpful tips:
- Use fresh ingredients – Fresh cake mix and icing will enhance the flavor and texture of your cookies.
- Pipe carefully – Take your time while piping the icing to achieve clean lines and a professional look.
- Chill before serving – Allow the assembled cookies to chill in the fridge for a few minutes before serving. This helps set the icing better.
- Experiment with colors – Feel free to mix different food coloring shades for unique designs that match your party theme.
- Store properly – Keep any leftover cookies in an airtight container to maintain freshness and prevent them from becoming stale.
Best Side Dishes for Halloween Witch Hat Cookies
To complement your Halloween Witch Hat Cookies, consider serving these festive side dishes that enhance the spooky atmosphere:
- Pumpkin Soup – A creamy, spiced pumpkin soup adds warmth and seasonal flavor to your Halloween menu.
- Witch’s Brew Punch – A fruity punch with floating fruit pieces creates a refreshing drink that kids will enjoy.
- Mummy Hot Dogs – Wrap hot dogs in crescent dough to create mummies, perfect for dipping in mustard or ketchup.
- Spooky Spider Deviled Eggs – Make classic deviled eggs and decorate them with olive slices for spider bodies—cute and creepy!
- Goblin Guacamole – Serve guacamole decorated with tortilla chips arranged like fangs; it’s both delicious and themed.
- Monster Veggie Platter – Create a platter of colorful veggies arranged like monsters, complete with dip for added fun.
- Graveyard Dirt Cups – Layer chocolate pudding with crushed cookies and gummy worms for a treat that looks like a graveyard.
- Ghostly Cheese Balls – Shape cream cheese into ghost figures, roll in herbs, and serve with crackers for a savory snack.
Common Mistakes to Avoid
Making Halloween Witch Hat Cookies can be a fun experience, but it’s easy to make mistakes. Here are some common pitfalls to watch out for:
- Using the wrong cake mix – Always choose a cake mix that complements the flavor of your cookies. A chocolate mix works best with the overall theme.
- Skipping cooling time – Allowing your cones to cool completely is crucial. If they’re warm, the icing may melt and lose shape.
- Overfilling the sugar cones – Filling the cones too much can lead to overflow during baking. Stick to 2 tablespoons per cone for perfect results.
- Ignoring icing consistency – Make sure your icing is not too runny or too thick. Aim for a smooth, workable consistency for easy decorating.
- Rushing the assembly – Take your time when assembling the witch hats. Let each layer set before adding more decorations for better stability.
Storage & Reheating Instructions
Refrigerator Storage
- Store Halloween Witch Hat Cookies in an airtight container.
- They will stay fresh for up to 5 days in the fridge.
Freezing Halloween Witch Hat Cookies
- Wrap cookies individually in plastic wrap before placing them in a freezer bag.
- These cookies can be frozen for up to 3 months.
Reheating Halloween Witch Hat Cookies
- Oven – Preheat to 350°F (175°C), place cookies on a baking sheet, and warm for about 5-10 minutes.
- Microwave – Heat one cookie at a time on medium power for 10-15 seconds until warm.
- Stovetop – Place cookies in a skillet over low heat for a couple of minutes, flipping occasionally to avoid burning.
Frequently Asked Questions
Here are some frequently asked questions about Halloween Witch Hat Cookies:
How can I customize my Halloween Witch Hat Cookies?
You can add different colored icings or sprinkles on top of your hats. Use edible glitter for a magical touch!
Can I use homemade cookies instead of store-bought?
Yes! You can make your own chocolate cookies using your favorite recipe if you prefer a homemade touch.
What other flavors work well with these cookies?
Besides chocolate, try vanilla or pumpkin-flavored cake mixes for a unique twist on Halloween Witch Hat Cookies.
How do I achieve different colors for icing?
Mix gel food coloring into your creamy white decorator icing until you reach the desired shade.
How many servings does this recipe yield?
This recipe makes about 12 Halloween Witch Hat Cookies, perfect for sharing with friends at your gathering!
Final Thoughts
These Halloween Witch Hat Cookies are not only delightful but also versatile! You can easily customize them based on your preferences or party themes. Try this fun recipe with kids, and create lasting memories while enjoying these charming treats!
Halloween Witch Hat Cookies

Halloween Witch Hat Cookies are a delightful and whimsical treat that will bring joy to your Halloween festivities. These enchanting cookies combine the rich flavor of chocolate with the creativity of decorating, making them perfect for parties or family baking sessions. With their vibrant colors and fun shapes, they’ll be the star of your dessert table. Crafting these treats is an engaging activity for kids, allowing them to customize each witch hat with their favorite icing colors. Watch them disappear faster than you can say “trick or treat!”
- Prep Time: 30 minutes
- Cook Time: 15 minutes
- Total Time: 45 minutes
- Yield: Approximately 12 servings
- Category: Dessert
- Method: Baking
- Cuisine: American
Ingredients
- Sugar cones
- Store-bought chocolate cookies (or homemade)
- Creamy white decorator icing
- Black color mist food spray
- Icing colors: orange, violet, rose, golden yellow, and lemon yellow
Instructions
- Preheat your oven and prepare the cake mix as per instructions.
- Fill sugar cones with cake batter and bake until done. Let cool.
- Spray cones with black color mist and allow to dry.
- Tint icing in various colors for decorating.
- Assemble by piping icing on cookies and attaching cones; let set before serving.
Nutrition
- Serving Size: 1 serving
- Calories: 180
- Sugar: 12g
- Sodium: 120mg
- Fat: 7g
- Saturated Fat: 3g
- Unsaturated Fat: 2g
- Trans Fat: 0g
- Carbohydrates: 27g
- Fiber: 1g
- Protein: 2g
- Cholesterol: 15mg